Anyone who has ever been to a Horsemanship clinic knows the value of a one-rein stop. It allows you to regain control of a troubled horse, helps supple the neck and begin to teach the horse how to catch its balance so that you can direct the feet. However, if the rider is not sitting in balance when performing a one-rein stop he could be contributing to the horse’s inability to stop at the same time as trying to help the horse.
Let me illustrate what I mean. Imagine you have a backpack strapped to your back which if full of rocks and sand. Now imagine that the pack has slipped to the left side of your back. What is that going to feel like when you are hiking down the trail? Obviously you are going to constantly adjust the unequal weight distribution by stepping left to stay under the load (or shift the pack to the middle of your back.) If you can’t shift the weight it may even cause you to rush downhill or stop to try to catch the backpack as it falls to one side. What would happen if you want to turn to the right when the backpack is on the left side of your back? You would have to stiffen your body and/or adjust your movements to deal with the unequal weight before you could make the turn.
Now think about your horse. You are the load on their back and suddenly you have shifted your weight off the left while you are asking the horse to do a one-rein stop on the right rein (horse’s head brought around to the right). What will happen to the horse’s balance with your weight on the outside of the circle? Well, a little physics here will help us understand what is going on. The weight distributed to the outside of the circle is going to cause the horse to fall in through his right shoulder or swing out with his hindquarters, depending upon which is his stiffer side, while the rein is drawing his head in to the right. The horse with the stiff right side will fall in through the shoulder and stiffen the right side of the neck as you try to turn the head. This will greatly increase the amount of force you will need to use to turn the head. If the right side is the more supple side of the horse, then he will overbend the head and neck while falling out with the hindquarters as he tries to step under the weight which is continuing to fall to the outside. In either circumstance the horse is going to have greater difficulty coming to a stop with his head appropriately turned because the rider’s weight contributed to the balance problem in the first place.
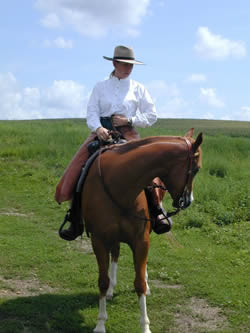
It is common to see horses (particularly young colts being started) looking distressed by a one-rein stop before they learn how to deal with the balance issue presented by a rider’s weight on their back. The horse is aware of the precarious nature of its balance and has not yet learned how to use its body to deal with this situation, i.e.: move its feet to adjust to the rider’s weight. If the rider is sitting out of balance, he is further contributing to the problem to the point where the results could be disastrous. In some cases an extremely heavy, out-of-balance rider or a rider who is severely braced can cause a horse to fall down using a one-rein stop. The leverage the rider has by bracing against an extremely stiff, short-wheel-based horse is enough to pull it over. Obviously it would be better to get the horse more supple on the ground to avoid this kind of situation in the first place. However, if the rider sat in a better position, not bracing into the tack and/or off balance, the horse would be more capable of responding appropriately to the one-rein stop. As the horse gains experience in moving its feet, it can handle the rider’s weight shifts without being so troubled which is why an older, experienced horse is better for a novice rider than a young colt. If the rider were to remain in alignment with gravity in the first place, he would not contribute to the horse’s difficulties and therefore be in a better position to help the inexperienced horse learn how to perform the exercise and move its feet.
As an example of how gravity and alignment affect movement, experiment with the following exercise. Stand up and allow your arms to hang by your sides. Now tip forward from your feet as far as you can without taking a step. Notice what parts of your body stiffened in order to prevent you from falling over. What has happened to the back of your neck, your knees and your feet? Are your toes gripping the floor? Return to the middle, where you are in alignment with gravity from the top of your head to your feet and notice that it takes very little effort to stand. Now lean back as far as you can and again feel what tightens up in order to prevent you from falling over. You might feel your abdomen tighten, your breathing become restricted and your joints stiffen. Repeat this exercise leaning to one side and then the other. Notice that in every direction you will have to stiffen joints and use muscle to prevent you from falling over.
Now start from the beginning again. This time as you move into the different positions try to take a step forward or sideways. Notice how difficult it is to move your feet when you are not in alignment with gravity. Observe how your arms want to brace in order to help you remain standing upright. Return to the middle position and notice that it is quite easy to move your feet when you are in vertical alignment with gravity.
By now I think you are getting the picture that you want to sit in the middle of the horse at all times. This will allow the horse to balance more easily. In addition, by sitting in the middle, the horse can focus on the movements you are asking from him rather than on catching your weight. So let’s look at how to ride a one-rein stop while staying in the middle of your horse.
To begin with, you can practice the movements for a one-rein stop while standing on the ground. Hook your bridle or a lead shank over a post or chair so you can simulate holding the reins. Take a position close to the post so that you have plenty of slack. Stand with your feet about hip-width apart and slightly bent at the knees similar to sitting on your horse. Notice that you will have your feet underneath you, not pushed out in front of you. By placing your feet under you, you can support your body weight. When you are on the horse you will want to be in a similar position. That way you won’t be bracing against your horse and creating a resistance. Practicing in front of a mirror will give you visual feedback to see if you are remaining straight and in the middle during the following exercise.
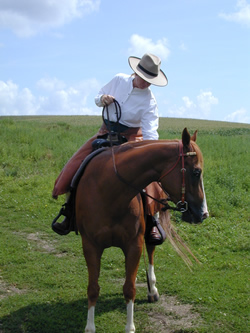
Place the loop of your reins in your left hand for a right hand one-rein stop. Draw your left hand holding the loop towards the top of your sternum while allowing your right hand to slide down the rein. Keep both collarbones wide and open as you do this. You will want to look ahead of you instead of down at your hands so that you keep the shoulders wide. (This is where looking in the mirror would be helpful because you can see what you are doing without having to look down.) It is important that you remain level through the shoulders and ribcage as you draw down on the rein.
One of the most common faults in rider body position in the one rein stop is to collapse through the ribs. Everyone will collapse more on one side of the ribcage than the other. This means that we will have a weak side and a stiff side, just like a horse. Men typically collapse more on the right while women tend to collapse more on the left. Collapsing through the ribs will throw your weight off to one side and force the horse to have to catch your weight shift whether you are aware of it or not. So as you draw down on the rein remember to watch the distance from the top of your hip to your under arm to make sure you keep your torso square. This will keep your weight evenly distributed on both of your seat bones.
Another point to remember is to keep your left wrist in line with your forearm as you draw it to your chest. If you cock your wrist in any direction it will cause your shoulders to round and your upper body to drop down. Notice that when you keep the wrist straight you are more capable of maintaining a strong upper body position. The action of drawing down on the rein is actually a combination of bringing the loop back to your chest and sliding your hand down at the same time. If you drop your upper body forward as you draw down on the rein you are throwing your weight onto the forehand of the horse. This will make it more difficult for him to shift his weight back to his hindquarters. So it is important that you remain upright and square through the shoulders as you draw down on the rein (photo of good vs. bad way to draw down on the rein).
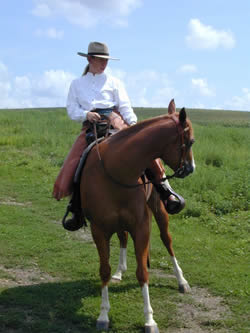
Next, take the right hand and place it on the point of your hip. This motion will bring the horse’s head around to the right. As you bring your hand to your hip, allow your elbow to move out to the side of your body. If your elbow goes behind your back instead of out to the side you will have a tendency to collapse through the waist and again drop the upper body forward, blocking your hips and throwing the horse on the forehand. (photo) As you make this motion you can allow your upper body to turn a little from the hips. You do not want to turn from the waist as this will separate your shoulders from your hips and reduce the effectiveness of this small rotation. Slight rotation allows the horse to come around with the shoulders and releases your hips so that you remain deep in the saddle.
As you make this slight rotation notice that your thighs follow through in the movement. Your feet remain in the same position you started in. Therefore in order for you to allow the rotation you will let the left knee (outside) drop down towards the ground. Your inside knee will open slightly. This is not a big move but it is important since the slight shift through the pelvis keeps the hip joints from tightening and restricting the movement. (photo) Dropping the outside knee also serves to support the horse on the outside of its body so that it can come to a stop.
After you have practiced this several times in both directions it is time to perform the same exercise while mounted. I suggest that until you have fully learned this body patterning you practice on a quiet, older horse that is going to tolerate your learning process. When you begin you might ask only enough to initiate the movement rather than doing a full one-rein stop. What is important in this phase of the learning process is that you practice the exercise accurately. Small precise movements are much more effective than large exaggerated moves. As the saying goes “less is more.”
If you happen to have a mirror in your arena it would be a good idea to stand in front of it so you can watch what you are doing. Once again, while mounted, start your one-rein stop by holding the loop of the rein in your left hand. Draw the loop up to your chest as you draw down on the rein with your right hand. Watch to see if your shoulders remain square or if you have dropped your inside should as you drew down on the rein. Notice if you started pushing your feet out in front of you as you made this move. If you did, remind yourself to keep your feet underneath you to prevent yourself from bracing through your legs. Check to see if your weight is still evenly distributed across your seat. You may have already moved to the outside when you unconsciously pushed your feet forward. Check to see if the saddle is still in the middle of the horse’s back. If the saddle is not sitting in the middle of the horse then most likely you are already sitting with your weight to one side. Readjust your saddle so that both of you are in the center. It is really important that your saddle remain straight in the middle of the horse’s back to prevent pressure on its spine.
If the rider drops to one side, that weight shift is going to alter where the saddle is sitting on the horse’s back. In extreme cases the saddle can wind up so far over that the bar of the tree is actually pressing on the horse’s spine. The spine is not designed to bear weight and any pressure on this area can be extremely painful to the horse. Imagine what it feels like when someone comes up to you and pokes you in the back. You immediately drop away from the pressure. The same is true for the horse. Since there is not real protective covering to the withers area, pressure on the side of the withers can be extremely painful. I am sure you remember what it feels like to bump your shin against something. There is no protective muscle over the shin so even a fairly gentle tap is quite uncomfortable. If the saddle has slid over to one side then the fork of the tree could be tapping onto the horse’s withers causing the horse to be distracted from the exercise and creating further anxiety. So it important to notice if you are pushing your saddle off to one side because you are no longer sitting in a vertical alignment to the ground. Sometimes it is the horse that is throwing the saddle off to one side because it has rolled its ribcage instead of bending through the ribs. In this case you still want to sit in alignment with gravity in spite of where the saddle wants to put you. Otherwise, if you follow the saddle, you will continue to put the horse off balance. Until the horse catches itself and brings the saddle upright you want to sit vertically with gravity, not following the saddle.
Again, draw up on the loop and down on the rein keeping your shoulders square and the weight equal on both seat bones. Now bring your right hand to your hip allowing your elbow to go out to the side. As you do this you will bring your horse’s head around to the right. Let your shoulders turn slightly to the right and allow the outside knee to drop down while your feet remain underneath you supporting your body weight. Your knee dropping down will serve to stop the outside shoulder from moving provided you simply let the knee drop down. Notice how the horse responds to your one-rein stop. Then for clarity, go back to your old way of doing a one-rein stop. Notice the difference in the horse’s ability to respond and the amount of effort you have to put into completing the exercise. Go back and forth a few times between the old way and the new way until you are clear about what the difference is. Let the horse help you make the decision.
Once you have developed this new habit pattern in your body off the ground and at a stand still, it is time to put it in motion. Begin practicing slowly at walk and then trot. At first you will find that you are placing all your attention on what you are doing with your own body and not paying very much attention to what the horse is doing. This is only temporary while you are developing the new habit pattern. As you become more familiar with using your body without slumping, twisting or dropping off to one side, you will not have to give so much of your attention to yourself and you will be able to focus more on what the horse is doing. Don’t be surprised if your horse is performing one-rein stops much better when you are focusing on yourself. As you improve your balance and alignment it makes it much easier for the horse to do his part well.
The next time you watch someone do a one-rein stop notice if they are staying in the middle of their horse, making the horse’s job easier, or if they are sliding off to one side. Watch how the horse has to compensate for the rider’s weight shifting off center. Perhaps you will understand why the task appears difficult for the young horse who is just learning where their balance is and how to move their feet.
Copyright© 2000. All rights reserved.

